Advanced Layer Settings
Use this dialog to configure advanced settings for layers in material types.
Where to Find the Dialog
On the toolbox, select SFI Properties... - Material Types - Edit Material Type - Advanced Settings.
Adjust Layer
Offset
This option adjusts the heights in the layer by the offset value.
Use it, for example, to calculate continuous lengths for different depths in trenches.
Example
Calculate the length where the trench is in the depth interval 0–1 m.
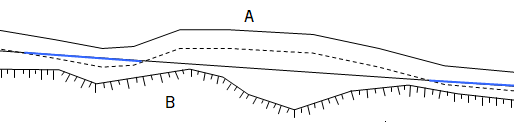
Blue line = Depth interval 0–1 m, A = Soil, B = Rock
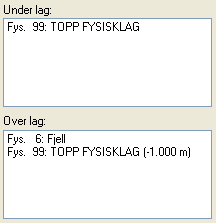
The material type is defined as follows:
Surface Selection
Limit the layer by specifying which surfaces should be included in the calculation. Enter a text string for the relevant surfaces.
Example
| String | Description |
|---|---|
| (-5.1),(5.1) | Area of surfaces -5.1 and 5.1 (only these two surfaces) |
| (-5.1:5.1) | Area from -5.1 to 5.1 (including all surfaces in between) |
| (-6.2),(-4.1:4.1),(6.2) | Area of surface -6.2, from -4.1 to 4.1 including all surfaces in between, and surface 6.2 |
Category
This option is relevant for tunnel contours. Use it if you want to use parts of a closed contour in composite layers or material types. The prerequisite is that you have assigned a type to the points in the contour.
Example
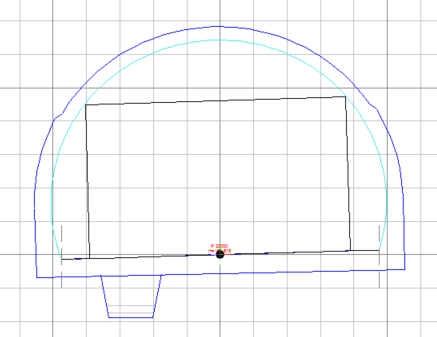
In the closed blasting contour, the surfaces in the base are coded with type Base.
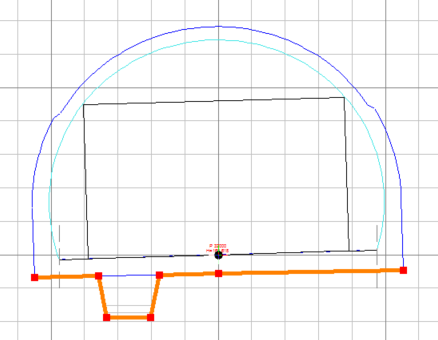
By selecting base under category in the advanced settings for the layer, only these surfaces will be used in the calculation of the composite layer.
You can then create a composite layer with base and trench.
Priority
Sometimes it is necessary to set a priority order for the layers to ensure the calculation is correct.
For example, you may have a layer with measured rock and a layer with assumed rock in the From Layer list. In this case, you want to calculate from measured rock, regardless of whether the layer is lower or higher than the layer with assumed rock. If the measured rock layer does not exist in an area, or data is missing in a profile, the material type should be calculated against the layer with assumed rock. The solution is to set priority 1 on the measured rock layer.
Other Options
Mandatory (layer must exist in profile)
Require that the layer must exist in the profile for the material type to be calculated. The option is marked with an M after the layer, for example Phys. 1:Soil (M).
Cut Areas Where Layer Is Undefined
The material type is only calculated where this layer exists. The option is marked with a C after the layer, for example Phys. 1:Soil (C).
Cut Areas Where Layer Is Defined
The material type is not calculated where this layer is defined. The option is marked with CD after the layer, for example Phys. 1:Soil (CD).
Set Opposite Highest/Lowest
When you have several From Layers (or To Layers), you must decide whether Lowest or Highest should apply. In some cases, it is necessary to treat some of the From Layers (or To Layers) as a group and make the opposite assessment among these first. When the option is active for a layer, it is marked with an * in the From Layer (or To Layer) list.
This option can be difficult to explain in words, but an example may clarify it.
Example
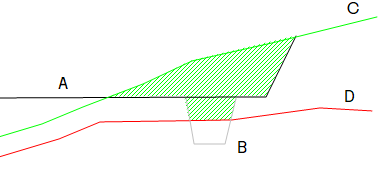
A = Surface Layer, B = Foundation Layer, C = Soil, D = Rock
The material type is defined as follows:
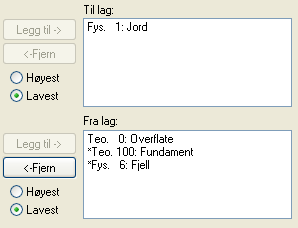
Restriction Layer If It Exists in Profile
If the layer exists in the profile, it is used as a restriction layer. The option is marked with an R after the layer, for example Phys. 1:Soil (R).
Reverse Layer Direction
The positive direction in a layer is from left to right, where the points are sorted. Use this option to reverse the direction of the layer. It is used, for example, in connection with material types for tunnels. The option is marked with a dash - after the layer, for example Phys. 1:Soil (-).
Preview
The dialog also provides a preview for advanced settings.
When you change parameters, the result is updated directly in the cross section. You can immediately see how the changes affect the material types.
Benefits
- Direct visual feedback on changes
- Easier to fine-tune advanced parameters
- Less need to close the dialog to check the result